
For a modern workflow, numerous displays are becoming increasingly crucial. You can easily extend screen on Windows 10 through the Project menu. It lets you duplicate, extend, and partially show the screen. It can take your productivity to a new level. In this article, we bring to you a helpful guide that will teach you how to duplicate screen on Windows 10.
How to Duplicate Screen on Windows 10
You can extend screen on Windows 10 very easily from the available options. Following are more info regarding creating duplicate screen on Windows 10.
- Duplicate screens can be quite useful for Desktop productivity allowing you to work on many apps simultaneously.
- You could use it to test how your work looks on a different display and resolution.
- In most circumstances, two screens are good enough, but if your PC can handle it, you can add a third screen for gaming.
What Are The Different Types of Display Modes?
Windows computers have two display modes when connected to an external monitor which can be switched easily:
- Mirror Mode: It copies the monitor on the external display allowing you to view the same image on both the PC and the projector.
- Extend Mode: It considers the external display as a distinct screen allowing you to have many active windows active on the projector and PC.
Method 1: Use Shortcut Keys
You can use the shortcut keys to switch between the various display options provided by Windows 10. Follow these steps to learn how to Duplicate Screen on Windows 10:
- Press the Windows + P keys together to cycle between the various modes. You will have the following options to select:
- PC Screen Only: It will only display your primary screen/ PC screen.
- Duplicate: It duplicates the primary screen through all available displays.
- Extend: It adds additional displays to the main screen.
- Second Screen Only: It will only display the second screen/television
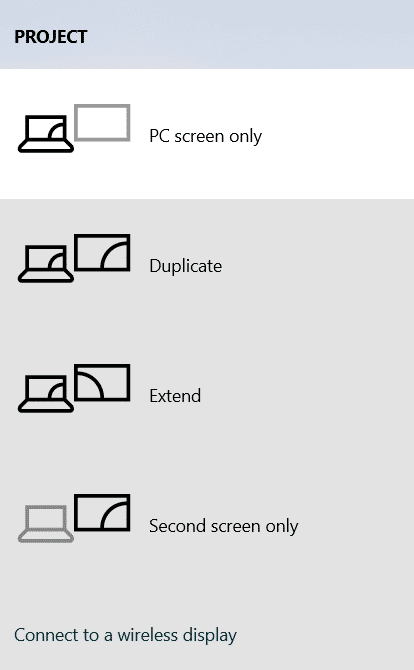
- To mirror or clone your primary screen across all extra displays, select Duplicate from the list.
- After this Windows will display the same screen on all of your secondary displays.
Method 2: Use Display Settings
If the shortcut keys method didn’t work for you then use display settings to change the display mode to duplicate screen. Instead of Mirroring, Windows uses the word Duplicate. Here’s how to duplicate screen on Windows 10.
Note: You can directly open display settings by right-clicking on your Desktop and select Display settings.
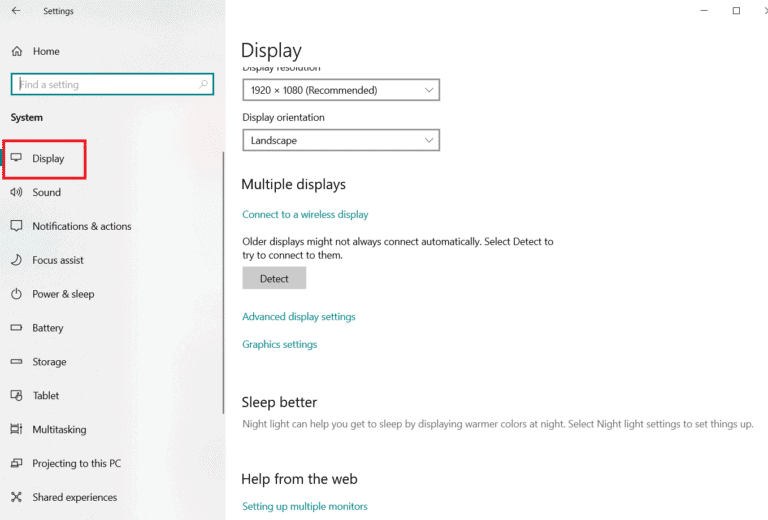
- Press Windows + I keys simultaneously to open the Settings.
- Click System.

3. Go to Display In the left pane.

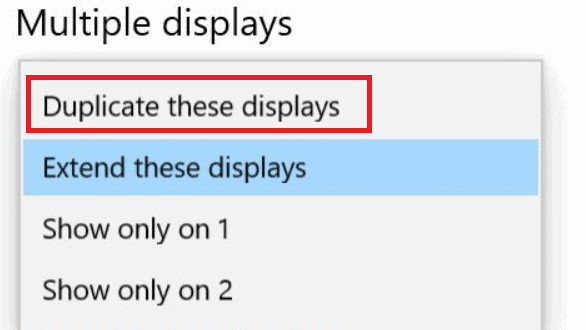
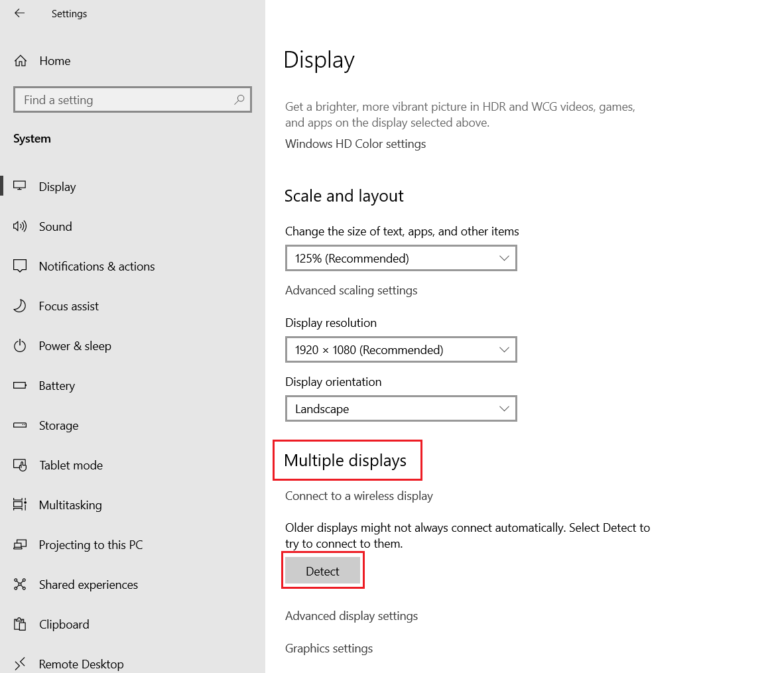
- Scroll down until you find the Multiple displays option, as shown above, in the Display settings.
- Select Duplicate these displays option to duplicate the primary screen across all monitors.
Hence this is how to extend screen on Windows 10.
Also Read: How to Setup 3 Monitors on a Laptop
What To Do If Options Aren’t Accessible or The Monitor Is Not Found?
If you’re installing a new monitor or projector, ensure it is attached to the proper port and is linked to the correct cable. If the hardware comes with a driver CD, make sure you install it as well so Windows can recognise and utilize it. You can manually detect a new monitor, projector, etc. performing the following steps.
- Go to Display Settings as shown above.
2. Click Detect under Rearrange your displays.
3. You can drag and drop the display in any direction in this window if you wish to alter its size and location.
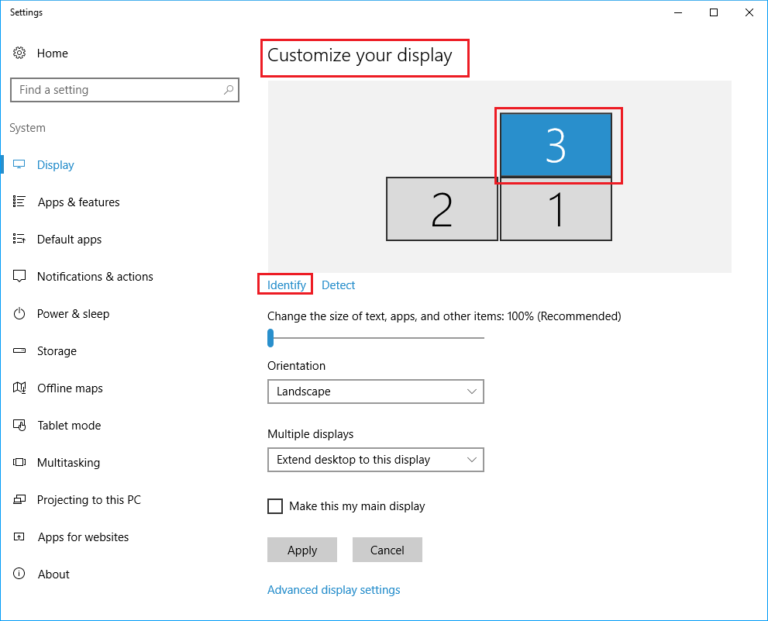
- Select Identify to identify the display so you can work out which number portrays which display.
Now your monitor will be detected as you continue to understand how to duplicate Screen on Windows 10
Also Read: How to Connect two or more Computers to one Monitor
What if Main Display is Swapped to Another Monitor?
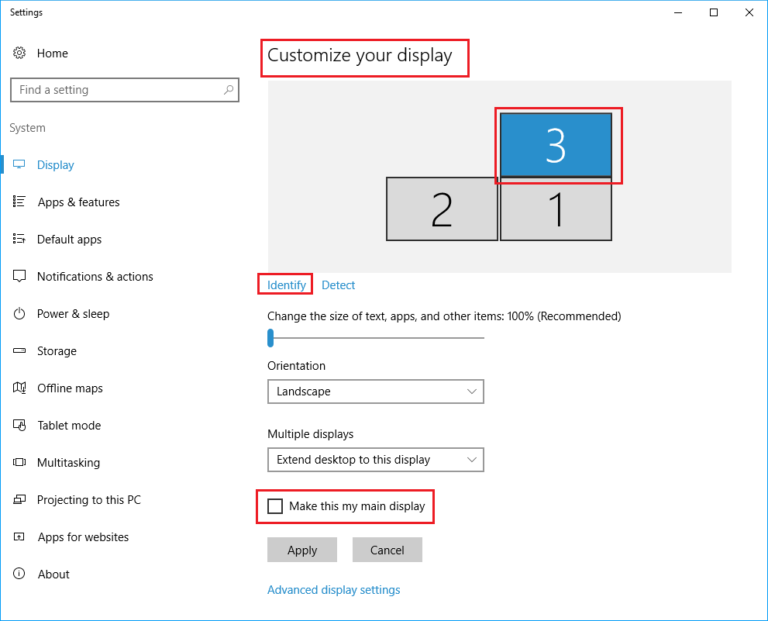
If your main display shifted to a monitor, TV or projector which you don’t want as the primary display then you can bring main display back to your chosen monitor by going to Display settings. This often happens after switching back from duplicate mode. Follow these steps to solve this issue.
- Follow Steps 1, 2, and 3 from Method 2 to Customize your display.
- To begin, click on the number that corresponds to the monitor you wish to use as the primary display.
- Select Make this my main display from the Multiple Display menu.
Frequently Asked Questions (FAQs)
Q1. Is it possible to duplicate and expand at the same time?
Ans. It can be done but it relies on whether you are using an integrated or dedicated graphics card and whether the graphics card maker offers software that supports it.
Q2. How can I exit the second screen in Windows 10?
Ans. Go to the monitor selection screen, hold down the Windows and P keys at the same time. Now press the down arrow key once and hit Enter key. That should make it a PC-only device.
Recommended:
- How to Delete Google Account from Chrome
- Fix No Sound in Firefox on Windows 10
- Fix Windows 10 brightness Not Working
- Fix Windows Update Install Error 0x8007012a
We hope you found this information useful and that you were able to learn how to duplicate screen on Windows 10. Please tell us which method worked best for you. If you have any queries or suggestions then feel free to drop them in the comments section.